How to Fix Holes in Cotton Aprons
Got a hole in your cotton apron? Don’t toss it just yet. Fixing it saves money, reduces waste, and keeps your favorite apron in use longer. Cotton aprons wear down due to laundry mishaps, sharp tools, or even pests, but simple repairs can make them good as new.
Key Solutions:
- Small Holes: Hand sew using a darning technique.
- Medium/Large Holes: Patch with matching or contrasting fabric.
- Prevent Fraying: Use zigzag stitches or fabric sealant.
- Tools You’ll Need: Needles, thread, scissors, fabric patches, and an iron.
Repairing is easy and rewarding. When repairs aren’t enough, consider replacing with durable options like reinforced aprons. Let’s dive into how to fix and maintain your apron.
APRONS NEED FIXING USING MY BROTHER LS14 / REPAIR DAMAGED CLOTHES / EASY SEWING! / Sewing Adventures

Cotton Aprons and Common Damage Causes
Knowing how cotton behaves as a fabric sheds light on why aprons develop holes and are prone to wear and tear.
Cotton Fabric Properties
Cotton is a popular choice for aprons because it’s breathable, absorbent (holding up to 27% of its weight in water), easy to clean, and durable. It also retains vibrant colors well. Its ability to absorb dyes ensures aprons stay colorful and appealing over time.
But cotton isn’t without its downsides. It has very low elasticity, meaning it doesn’t stretch much. This rigidity can lead to stress points that eventually tear. Cotton is also vulnerable to acids, alkaline substances, and UV rays. When choosing a cotton apron, lighter fabrics are easier to move in, while denser weaves last longer. For kitchens with heavy laundry needs, cotton blends might hold up better than pure cotton.
How Holes Form in Aprons
Cotton aprons face damage from various sources, and knowing these risks can help you avoid them. One of the biggest culprits? Poor laundry practices. Overloading washing machines can cause aprons to snag on zippers, buttons, or embellishments, leading to tears and small holes.
Kitchen use also takes a toll. Sharp tools and equipment can cut the fabric, while rough edges on counters or appliances can snag it, creating small holes that worsen over time. Even leaning against counters repeatedly can wear down the material.
Chemical exposure is another concern. Misusing chlorine bleach, kitchen acids, or alkaline solutions weakens cotton fibers quickly. Prolonged exposure to UV rays, whether from windows or outdoor cooking, can break down the fabric’s cellulose fibers, causing yellowing and deterioration.
Laundry-related mechanical damage goes beyond overloading. High spin cycles can strain fibers, and misaligned dryer drums can snag and tear fabric. Frequent washing itself gradually breaks down fibers over time.
Pests like clothes moths and carpet beetles are also a threat. Moths often leave multiple small holes in a "honeycomb" pattern. Female moths can lay between 100 and 300 eggs, while carpet beetle larvae feed on fabric for months or even years before pupating.
"Clothes moths are a species that are ever increasing and that can cause significant damage to clothes, carpets and other home textiles." - MothPrevention®
A study revealed that every home surveyed contained at least one type of carpet beetle, highlighting the need for pest prevention to keep aprons intact.
The lifespan of an apron depends on how often and intensely it’s used. Whether it’s in the chaos of a professional kitchen or during occasional home cooking, understanding these damage patterns can help you pinpoint the cause of a hole - whether it’s regular wear, preventable mistakes, or a deeper issue. This knowledge will guide your approach to repairs, which we’ll explore in the next section.
Tools and Materials for Apron Repairs
You don’t need a fancy sewing setup to fix an apron. With the right tools and materials, you can handle repairs quickly and neatly, ensuring they last.
Basic Sewing Supplies
Start with some hand sewing needles in various sizes. Medium-weight needles are great for most cotton aprons, but heavier needles are essential for thick seams or layered fabric. A sharp needle is key to piercing cotton smoothly without snagging.
Choose thread that closely matches your apron’s color. Cotton or cotton-polyester blends work best with cotton aprons because they stretch and wash similarly. High-quality thread is worth it - cheaper options can break easily and even damage your fabric.
A good pair of scissors is a must for clean cuts. For detailed work, keep a pair of small embroidery scissors handy to trim thread close to the fabric.
Pins are useful for holding fabric in place while you sew. Glass-head pins are a smart choice - they won’t melt under an iron, and their bright colors make them easy to spot and remove.
While a sewing machine isn’t required, it can save time when repairing larger holes or working on multiple aprons.
Once your basic tools are ready, you’ll need to pick the right patch materials to match your apron.
Patch Materials
The weight of your patch fabric should match your apron to ensure a seamless repair. For cotton aprons, materials like denim, canvas, stiff cotton, or heavyweight twill work well.
Iron-on patches are a quick fix for small to medium holes. For instance, the ZEFFFKA Premium Quality Fabric Iron-on Patches (12 pieces, 3" x 4-1/4") cost $9.99 and have a 4.3-star rating from over 2,600 Amazon reviews. These patches are versatile, come with clear instructions, and are easy to use.
"These were easy to use; I was even able to cut them in half for small holes. An iron set to high worked well. I would recommend these since they are reasonably priced and can be washed and re-ironed up to 3 times if needed."
– Trainman, Amazon Customer
While these patches generally hold up well through multiple washes, some users have noted occasional issues with sticking or fabric burning during application. To avoid problems, test the patch on a hidden part of the apron first.
For larger repairs, fusible webbing like WRIGHTS Iron-On Mending Fabric is a solid option. A 6-1/2" x 14" piece costs $4.77 and creates a durable bond between the patch and the apron fabric.
When choosing patch fabric, you can either match the original material for a subtle look or use contrasting colors to turn the repair into a design feature.
Extra Tools
A few additional tools can make the repair process smoother and more precise.
- Use a fabric marker or Hera marker to outline cutting lines without leaving permanent marks.
- A measuring tape ensures your patches are the right size and properly aligned. A clear acrylic ruler also helps with straight cuts and small measurements.
- An iron is essential for pressing seams and applying iron-on patches. A travel-sized iron works well for small repairs and doesn’t require a full ironing board.
- Seam rippers are lifesavers for removing damaged stitching or fixing mistakes. Keep a few sizes on hand - they tend to wear out with frequent use.
- A stiletto or awl helps position fabric precisely under your sewing machine needle, especially when working with thick patches or multiple layers.
- Beeswax strengthens thread and reduces tangling during hand sewing. Run your thread through a small piece of beeswax before starting for smoother stitches.
- Liquid sealant prevents fraying around cut edges and secures thread ends, which is especially helpful when you can’t tie knots on both sides of the fabric.
"Less frustration means more sewing satisfaction and keeps me coming back for more."
Investing in quality tools and materials not only makes repairs quicker but also ensures they’re clean, durable, and professional-looking. A little preparation goes a long way!
Step-by-Step Repair Methods
With your tools ready, choose the repair method that suits the size of the hole in your apron. These techniques not only fix the damage but also help extend the life of your apron with simple, reliable solutions.
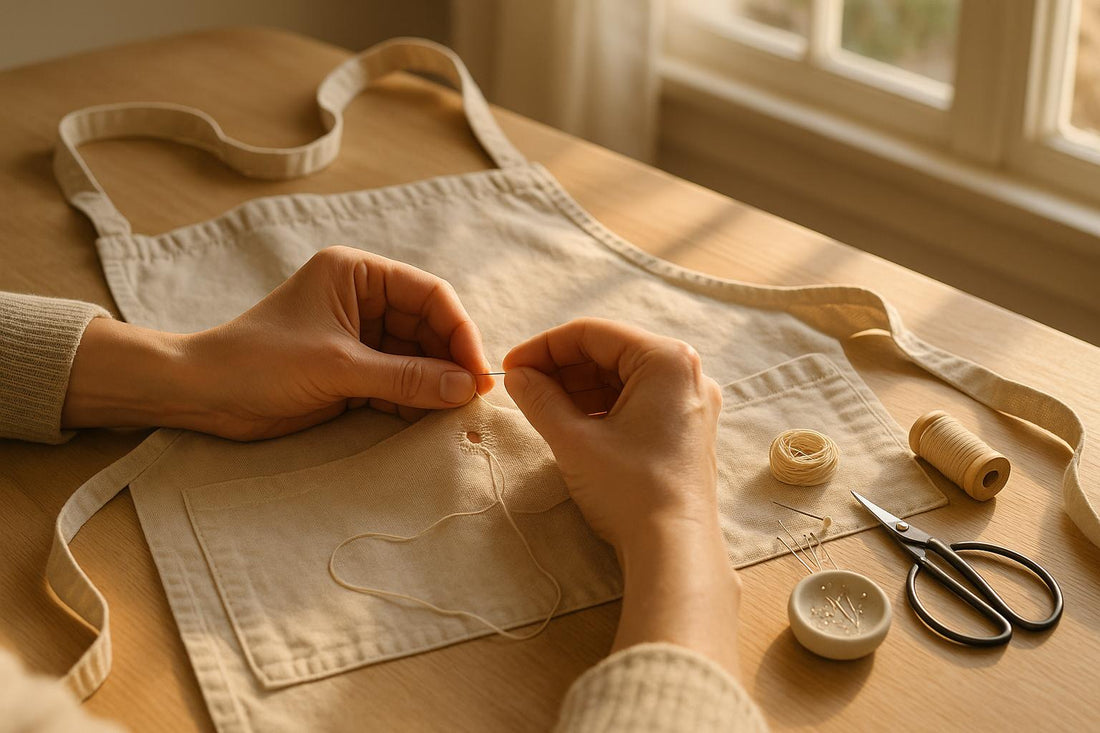
Hand Sewing Small Holes
For small holes in cotton aprons, darning is a tried-and-true technique. This method involves weaving new threads into the damaged area to rebuild the fabric's structure. Start by threading a needle with cotton thread that matches the color of your apron. Cut an 18-inch length of thread to avoid tangling as you work.
To keep the fabric smooth, place a darning egg or mushroom under the hole. If you don’t have one, a light bulb or the handle of a wooden spoon works just as well. Begin by stitching a foundation of vertical threads about 1/4 inch beyond the edges of the hole. Use small running stitches leading to the damaged spot, then lay down straight stitches across the hole, spacing them about 1/8 inch apart. Extend these stitches slightly past the opposite edge to secure them.
Next, weave horizontal threads over and under the vertical stitches, pulling gently but firmly. For a creative twist, you can try visible mending with embroidered designs like flowers, stars, or geometric shapes. This adds a decorative touch to your repair while keeping it functional.
For larger or more noticeable holes, patching is often a better option.
Patching Medium and Large Holes
When dealing with holes larger than a quarter, patching is usually the best approach. Mary Earle-Sigler of The Daily Sew offers a practical method for patching. Start by selecting a patch fabric that matches your apron in weight and care requirements.
"The patch should be from fabric of a similar weight and exact care instructions as the garment. Bonus if it matches the garment but if not choose something that will blend in".
She also advises on color choice:
"If you have to choose between a patch a little too light and a patch a little too dark, go with the darker patch. It will recede and therefore blend in better".
Cut the patch so it extends 1/4 to 1/2 inch beyond the hole on all sides, and round the corners slightly to prevent peeling. If your apron has a printed design, you can use fine-tip markers to replicate the pattern on your patch for a seamless look.
For fusible webbing, trim it slightly smaller than the patch, leaving a 1/4-inch border. Place the webbing between the patch and the apron, cover it with a press cloth, and iron it for 10–15 seconds using firm pressure (or follow the manufacturer’s instructions).
To secure the patch, use a whip or blanket stitch by hand, spacing the stitches about 1/8 inch apart around the patch edge. For a faster option, machine-sew with a zigzag stitch along the perimeter, which prevents fraying and adds durability. If you have access to a serger, an overlock stitch provides an even stronger finish.
Finishing and Securing Repairs
Once your patch is in place or the stitching is complete, focus on finishing touches to ensure the repair is durable and professional-looking. Secure your stitches with a few backstitches or whip stitches at the end of the seam. To prevent unraveling, you can add a small dot of fabric glue to knots or thread ends.
For areas that experience a lot of wear and tear, reinforce the repair with extra stitching. As workwear designer Sarah Johnson explains:
"Reinforced stitching is the foundation of workwear longevity. It's all about the details, from the strength of the thread to the precision of the stitching. These factors make a significant difference in the overall quality and lifespan of work garments".
A zigzag stitch over raw edges helps prevent fraying while keeping the fabric flexible. You can also finish the patch with a fabric sealant or fray check for added security.
Trim any loose threads with sharp embroidery scissors, leaving about 1/8 inch to reduce the risk of unraveling. Test your repair by gently stretching the fabric around the fixed area. A well-done repair should move naturally without puckering. If you notice any loose spots, add a few more stitches to ensure everything is secure.
sbb-itb-c693c43
Tips for Durable and Clean Repairs
Getting a repair to last years instead of just a few months often boils down to using the right materials and techniques. Here are some strategies to help you achieve repairs that not only look professional but also hold up to wear and washing.
Selecting Patch Fabric
Choosing the right patch fabric is key. Aim for a material that matches your apron's weight and color. Natural fibers like cotton, denim, or twill are excellent options because they provide durability. On the other hand, steer clear of wrinkle-free or loosely woven fabrics, as they don't bond well with iron-on patches.
Cotton is ideal for iron-on patches since it can handle high heat, making the bond stronger. Some poly-cotton blends might work, but avoid anything labeled "wrinkle-free" - these materials resist proper adhesion. Loosely woven fabrics and most knits aren't great for patches either. However, tightly woven knits, like those found in t-shirts, can work better for iron-on applications.
For aprons that need to endure heavy use, denim and twill are excellent choices. Denim provides the toughness needed for embroidered patches, while twill offers a fine weave and strong heat resistance. Both materials are perfect for areas that see a lot of wear and tear.
Once you've selected a sturdy material, it's time to decide if your repair should blend in or stand out.
Hidden vs. Decorative Repairs
After settling on the patch material, think about the style of your repair. Should it seamlessly blend into the apron, or should it double as a design element? Hidden repairs use fabric that matches the original, while decorative ones can feature embroidery or contrasting patterns for a creative touch.
For larger holes in visible areas, embroidery techniques like sashiko can not only cover the damage but also add a unique flair. For smaller holes, consider using embroidery floss to create eye-catching patterns that turn your repair into a feature.
Preventing Fraying and Adding Strength
To make your repair last, focus on securing the patch edges. Use pinking shears, a zigzag or overlock stitch, and a small amount of fabric glue to prevent fraying. These steps ensure your patch stays intact through repeated use.
For fabrics prone to fraying, Martha Stewart suggests:
"When dealing with fray-prone fabrics like linen, prevent edges from unraveling by using a zigzag stitch or overcasting stitch on your sewing machine. If working by hand, I recommend whip stitching the cut edge. Take care not to pull too tight or pucker the fabric. For extra security, apply a thin line of fabric glue or Fray Check sealant."
If you're in a hurry, fabric glue or seam sealant can provide a quick fix. Just be cautious with lighter fabrics to avoid creating visible dark spots. For hand-sewn repairs, a whipstitch close to the edge works well; keep the tension even to avoid puckering.
Another effective method is folding the patch edges before sewing. This approach is especially useful for square or rectangular patches, as it creates clean, hemmed edges that resist fraying even after multiple washes.
When to Replace Instead of Repair
While repairs can often extend the life of an apron, there are times when replacement is the smarter choice. Some aprons become so worn that no amount of patching will restore their functionality. Recognizing when it’s time to move on can save you time, money, and unnecessary frustration. Here’s how to assess whether repair is still worth it.
Checking Apron Condition
Before sinking more effort and money into repairs, take a close look at your apron's overall condition. Significant damage is often a clear sign that replacement is the better option.
Examine the fabric for signs of wear, like thinning material, clusters of holes, or areas that tear easily. Over time, heavy use - especially in high-stress spots like pocket corners or where ties attach - can lead to irreparable damage.
Structural issues are another red flag. Large tears in the main body, fabric that’s nearly see-through, or frayed straps and neckbands often signal the end of an apron’s useful life. These problems are typically beyond what patches can fix.
It’s also important to weigh the costs of repair versus replacement. As Fremont Automation points out, "When it comes to deciding whether to repair or replace equipment, there are a few things to think about". Consider the resources needed for repairs - materials like thread and patches, plus the time involved. If these add up to more than the cost of a new apron, replacement is likely the better choice. The apron’s age matters, too. Items that have been repaired multiple times are more likely to fail again, leading to a cycle of ongoing fixes. Safety should also factor into your decision - cosmetic damage that affects how the apron fits can increase risks, especially in a fast-paced kitchen.
Upgrading with Cosmic Aprons

When repairs no longer make sense, upgrading to a high-quality replacement can improve both your workflow and safety. Cosmic Aprons offers durable cotton aprons designed for everyday use in demanding environments.
When selecting a replacement, focus on features that ensure longevity. Cosmic Aprons’ designs include adjustable straps for a secure fit, reinforced pockets for holding kitchen tools, and sturdy stitching at stress points. These aprons also prioritize comfort, with breathable fabric that holds up during long cooking sessions.
Whether you need a heavy-duty apron for grilling or a versatile option with multiple pockets for daily kitchen tasks, Cosmic Aprons has a range of styles to suit your needs. Their thoughtful designs combine functionality with durability, making them a reliable choice.
Investing in a well-made apron can save you money in the long run. Instead of repeatedly repairing an old one, a high-quality apron will last for years with minimal upkeep. Cosmic Aprons even offers perks like free shipping and flexible returns, so you can try out your new apron with confidence. A good replacement not only reduces repair headaches but also enhances your daily routine.
Conclusion: Fixing Your Aprons with Simple Repairs
Repairing cotton aprons is a great way to save money, cut down on waste, and make the most of what you already own. Plus, it’s a chance to add a bit of your own flair to something you use every day.
A small tear or worn spot doesn’t have to mean the end of your apron. A quick stitch or patch not only fixes the problem but also lets you customize your apron. These little touches can turn a simple repair into a unique design that shows off your personality.
There’s also something calming about visible mending. The steady, repetitive motion of sewing can feel like a mini mental reset, giving you a break while you repair both the fabric and your mindset.
So, grab your needle and thread! Try out the hand sewing and patching techniques mentioned earlier, and don’t forget to follow proper care tips to keep your apron in top shape.
And when your apron has truly seen better days, consider upgrading to a durable Cosmic Apron. With reinforced stitching, adjustable straps, and secure pockets, it’s built to last - and it comes with free shipping and flexible returns.
Whether you’re repairing an old favorite or investing in a new one, every effort you make helps your wallet and the planet at the same time.
FAQs
What mistakes should I avoid when repairing holes in cotton aprons to make the fix last longer?
To make sure your cotton apron repair lasts, steer clear of these frequent missteps:
- Skipping reinforcement: Always take the time to strengthen frayed or damaged edges before stitching. This extra step prevents further tearing down the line.
- Choosing the wrong thread: Use a high-quality, durable thread that closely matches your apron’s fabric. This ensures the repair holds up under stress.
- Sloppy stitching techniques: Stick to even, secure stitching. Avoid stitches that are too loose or too tight, as either can compromise the repair's durability.
- Exposing fabric to harsh chemicals: Keep your apron away from bleach or strong chemicals, which can weaken the cotton fibers over time.
By avoiding these mistakes, your repairs will stand up to daily wear and repeated washing.
How can I keep my cotton apron from getting holes?
To keep your cotton apron looking and functioning its best, handle it with care. Avoid subjecting it to too much friction, especially around areas like the waist and straps, which tend to experience the most stress. When it’s time to wash, stick to a gentle cycle with cold water to reduce wear and tear. Air drying is your best bet to maintain the fabric's strength and longevity.
For storage, choose a clean, dry spot and steer clear of sharp objects or rough surfaces that could cause damage. If you're looking for an apron that stands the test of time, consider investing in a durable option, such as those offered by Cosmic Aprons. They're built to last.
What are the advantages of using a sewing machine instead of hand sewing to repair larger holes in cotton aprons?
Using a sewing machine to fix larger holes in cotton aprons comes with a lot of perks. For one, it’s much quicker and results in sturdier, longer-lasting seams - perfect for aprons that go through heavy use and frequent washes. While hand sewing gives you more precision and control, it takes longer and doesn’t always match the strength of machine stitching. When it comes to bigger repairs, a sewing machine is the go-to choice for efficiency and durability.